Here are quick directions on exporting a video in Adobe Premiere Pro to a compatible format (H.264/MP4) for playing on computers, tablets, smartphones and can also be used for uploading to YouTube and Vimeo.
STEP 1 – Select the Sequence
Select the Sequence you want to export in the Timeline panel.
You’ll notice the border around the selected sequence panel turns to orange when selected.

STEP 2 – Export Media Settings
Select File → Export → Media… from the menubar.

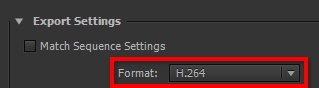
STEP 3A – Export Settings | Format
On the right in the Export Settings window, Format: select H.264. H.264 will create an MP4 video file that is playable on most computers, tablets, and smartphones.
STEP 3B – Export Settings | Presets
From the Presets dropdown, move your mouse to the bottom of the giant list of options and click on the black upside-down triangle to move down the list to the Vimeo & YouTube options.

Based on your sequence settings, choose the best output.
![[CLICK TO VIEW] Adobe Media Encoder H.264 Presets for YouTube and Vimeo.](https://evscicats.com/wp-content/uploads/2014/01/adobe-media-encoder-youtube-vimeo-presets.jpg)
STEP 3C – Export Settings | Output Name
Click on the Output Name to give the file a custom name and setup the save location on your hard drive.

STEP 3D – Export Settings | Export or Queue
OPTION 1 | EXPORT – Click the Export button at the bottom to start exporting the file.
OPTION 2 | QUEUE – If you know you want to keep working and export the file later, select Queue to send the export job to the Adobe Media Encoder program. The Adobe Media Encoder allows you to export a batch of videos at a later time.

STEP 4 – Play Before You Upload
Before uploading the video to YouTube or Vimeo, be sure to play it on your computer to ensure the final product is of the highest quality you expect for your viewing audience.
Troubleshooting Tips
- Computer is slow or freezes when exporting.
- Turn off all programs except for Premiere Pro.
You might even try turning off some of those little programs that are running down by your clock that you know you don’t need running like Google Drive and Dropbox. Be careful not to turn off your sound card or your video driver software! - Shut down your computer and then restart it.
When you restart your computer, turn off any background programs that you can think of or that you’re capable of turning off to free up memory. Then start Premiere Pro.
- Turn off all programs except for Premiere Pro.
If you have any questions or additional tips on exporting video in Adobe Premiere Pro, please leave a comment below.